
How Long To Cook Steak On The Grill
Imagine you’re at your backyard grill, holding a spatula. The steak is sizzling, and the smell is amazing. Your guests are eager to eat. But you’re wondering—when is it ready?
Getting the timing right is key. Too soon, and it’s raw. Too late, and it’s tough and overcooked.
Many things affect how long you cook. The steak’s thickness and type matter. So does the temperature. And how well you like it cooked changes everything.
Learning perfect grilled steak timing isn’t just about the clock. It’s about heat, meat, and technique. This guide will teach you what you need to know.
Whether you’re starting out or getting better, you’ll learn what it takes. Restaurant-quality results from your own backyard are closer than you think.
Table of Contents
Understanding Grill Temperature Basics
Mastering temperature control is key to grilling great steaks. It lets you cook with precision and confidence. Your grill becomes a reliable tool, not a source of uncertainty.
Temperature, cooking time, and steak quality are linked. Heat is what creates flavor, texture, and that caramelized crust. Without the right temperature, you’re just guessing.
Ideal Temperature Ranges for Grilling Steak
Your grill should be between 450°F and 500°F for the best steak. This heat creates a caramelized crust and the right doneness inside. The Maillard reaction makes the steak taste amazing.
Most top steakhouses cook at this temperature. The high heat sears the steak fast, locking in moisture. You’ll see a big difference in taste and texture.
For thicker steaks, use temperatures between 350°F and 400°F. These lower temperatures prevent burning the outside before the inside is done. Save the highest temperatures for thinner steaks.
Direct Heat vs Indirect Heat Methods
Direct heat means placing your steak right over the flames. It’s great for standard-thickness steaks that cook fast. It’s best for quick browning.
Indirect heat cooks the steak away from the flames. It’s better for thick cuts and even cooking. This method is perfect for controlled cooking.
Many grillers use both direct and indirect heat. They start with direct heat for the crust, then move to indirect for the inside. This gives you control over both the crust and the inside.
Preheating Your Grill for Optimal Results
Always preheat your grill for 10 to 15 minutes before cooking. This ensures even heat. Skipping preheating can lead to uneven cooking.
You can test the heat with the hand method. Hold your palm five inches above the grate. If you can’t keep it there for two to three seconds, it’s ready.
A grill thermometer gives the most accurate readings. Built-in thermometers often measure ambient temperature. Use an infrared or probe thermometer for direct readings.
Gas grills offer better temperature control than charcoal. You can adjust the burners for precise heat. Charcoal grills need careful coal arrangement and vent adjustments for consistent heat.
Gas grills keep the temperature steady once set. Charcoal heat changes as coals burn down. Both methods need different techniques for great results.
Preheating also cleans the grates. Clean grates prevent sticking and help with sear marks. Your steak will release easily from clean, preheated grates.
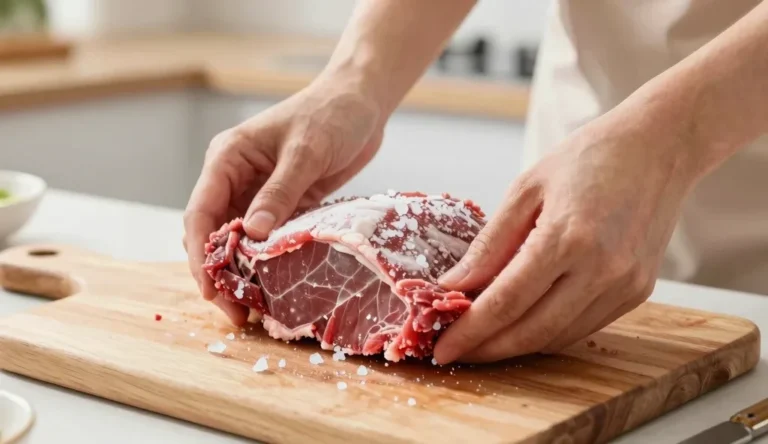
Preparing Your Steak Before Grilling
Getting your steak ready before grilling is key to great results. It affects how evenly it cooks and how tasty it tastes. By preparing well, you can get your steak just right, from edge to center.
Many grill masters focus on heat and timing but forget about preparation. But, how you handle your steak before grilling makes all the difference. It can turn a good steak into a great one with a perfect crust and juicy inside.
Bringing Steak to Room Temperature
Take your steak out of the fridge 30 to 60 minutes before grilling. This lets it warm up evenly. A cold steak cooks unevenly, with a cold center and overcooked edges.
The thickness of your steak decides how long it should sit out. A one-inch steak needs about 30 minutes, while thicker ones take an hour. This warming up makes the steak cook more evenly.
When your steak is at room temperature, it gets a better crust. The moisture on the surface evaporates quickly. This helps the meat brown faster and seal in juices, adding flavor.
Never leave raw steak at room temperature for more than two hours to keep it safe. If it’s warm, reduce the time. You want the meat to lose its chill, not get warm.
Seasoning Techniques and Timing
How and when you season your steak affects its taste and texture. Salt is a big deal, and when you use it matters. You can salt your steak at least 40 minutes before grilling or right before.
Salting early helps the salt penetrate deep into the meat. This method makes the steak taste better all the way through. It’s not just the surface that gets the flavor.
But, avoid salting too close to grilling. This can make the steak wet and prevent it from browning well. It messes with your grilling time and can make the steak uneven.
For quick seasoning, salt and pepper right before grilling. This is good if you’re short on time. It adds flavor fast without making the steak wet.
You can also use dry rubs or custom spice blends. Use the same timing as salt. Make sure the seasoning sticks to the meat.
| Seasoning Method | Timing Before Grilling | Primary Benefit | Best For |
|---|---|---|---|
| Dry Salting | 40+ minutes | Deep flavor penetration | Thick steaks, planned meals |
| Quick Season | Immediately before | Surface flavor, convenience | Last-minute grilling |
| Dry Rubs | 2-24 hours | Complex flavor layers | Bold taste preferences |
| Marinades | 4-24 hours | Tenderizing, moisture | Leaner cuts, flavor infusion |
Oiling the Steak vs the Grill Grates
Oiling your steak is better than oiling the grill grates. It helps the steak brown better, prevents sticking, and protects it from heat. It also lets you control how much oil you use.
Use oils that can handle high heat, like avocado oil or canola oil. A thin layer of oil, about one tablespoon per pound, is enough. It helps the steak cook evenly and prevents seasonings from burning.
Spread the oil evenly over the steak. This helps heat transfer and keeps seasonings in place. It also prevents the steak from sticking to the grates.
While oiling the steak is key, don’t forget to prepare your grill grates. Clean them with a brush while they’re hot. Then, lightly oil them with a paper towel held with tongs.
Oil the grates for a non-stick surface. This makes flipping easier and prevents the steak from tearing. It’s a good combination with oiled steak.
Never spray oil directly onto hot grill grates over an open flame. It can cause flare-ups. Instead, turn off the burners, apply oil, and then relight. For charcoal grills, oil the grates before placing them over the coals.
How Long to Cook Steak on Grill by Doneness Level
Learning about steak doneness levels makes grilling easier and more reliable. Each level has a specific temperature range and cooking time. Your choice of doneness depends on your taste, but the science is the same.
These times are for 1-inch thick steaks cooked at high heat (450-500°F). Thicker or thinner steaks need different times. Your grill might affect these times slightly.
Rare Steak Timing and Temperature
Rare steak cooks quickly to sear the outside and keep the inside red. It takes about 4-5 minutes total, flipping once at 2 to 2.5 minutes.
The internal temperature should be 125°F. The center will be bright red and cool. The steak feels soft and spongy.
Rare steak is moist and tender. But it’s not for everyone, or all beef cuts.
Medium-Rare Steak Cooking Time
Medium rare is a favorite among steak lovers and chefs. It offers a balance of tenderness and flavor.
It takes 6-7 minutes total, about 3 to 3.5 minutes per side. Aim for an internal temperature of 135°F. The center is warm red, with pink edges.
This doneness is juicy and flavorful. It’s perfect for premium cuts.
Medium Steak Grilling Duration
Medium steak has less red but is not too pink. It takes 8-10 minutes total, grilling 4 to 5 minutes per side.
Target an internal temperature of 145°F. The center is warm pink, with grayish-brown edges. The texture is firmer than medium rare but juicy.
More fat renders out, adding flavor. The steak is less tender but more flavorful.
Medium-Well Steak Guidelines
Medium well has a hint of pink in the center. It takes 10-12 minutes total, with 5 to 6 minutes per side.
The internal temperature should be 150-155°F. The meat is firm, and moisture decreases. Only a narrow pink band remains.
Choose fattier cuts like ribeye to avoid dryness. Leaner cuts may become tough.
Well-Done Steak Cooking Time
Well-done steak takes the longest—12-14 minutes or more, depending on thickness. Cook 6 to 7 minutes per side, ensuring no pink.
The internal temperature should reach 160°F or above. The steak is uniformly brown and firm. Most moisture is cooked out.
If you like well-done steak, choose fattier cuts. Reduce grill temperature to prevent burning.
| Doneness Level | Internal Temperature | Total Cooking Time (1-inch steak) | Center Appearance |
|---|---|---|---|
| Rare | 125°F | 4-5 minutes | Cool, bright red |
| Medium-Rare | 135°F | 6-7 minutes | Warm, red center |
| Medium | 145°F | 8-10 minutes | Warm, pink throughout |
| Medium-Well | 150-155°F | 10-12 minutes | Slight pink hint |
| Well-Done | 160°F+ | 12-14+ minutes | No pink, fully cooked |
These levels are your guide for consistent grilling. Remember, steak thickness, grill temperature, and heat source matter. Medium rare is often the best for premium cuts, but choose what you like.
Remember that these times are starting points, not rigid rules. Your grill, outdoor temperature, and wind can change cooking times. Use a meat thermometer for perfect results every time.
Cooking Times Based on Steak Thickness
Before you start grilling, measure your steak’s thickness. This step helps avoid undercooked or charred steaks. The steak’s thickness affects both cooking time and the grilling method you should use.
A ruler or measuring tape is essential for planning the grilling time. Thickness is more important than any other factor.
Heat penetrates meat at a steady rate. So, thicker steaks need more time than thinner ones. A two-inch steak takes much longer than a one-inch steak.
Thin Cuts: Half-Inch to Three-Quarter-Inch Steaks
Thin steaks cook quickly on a hot grill. They need only 2-4 minutes for medium-rare. You must watch them closely.
Flip these steaks once, after 90 seconds on the first side. The second side takes another minute or two. Overcooking happens in seconds with thin steaks.
Thin steaks cook best with high heat. This helps create a crust before the inside gets overcooked. They’re not good for slow-cooking methods.
Standard Thickness: One-Inch Thick Steaks
The one-inch steak is a common reference point. It takes about 6-7 minutes to cook to medium-rare.
Here’s a basic cooking time guide for one-inch steaks:
- Rare: 4-5 minutes total (2-2.5 minutes per side)
- Medium-rare: 6-7 minutes total (3-3.5 minutes per side)
- Medium: 8-9 minutes total (4-4.5 minutes per side)
- Medium-well: 10-11 minutes total (5-5.5 minutes per side)
One-inch steaks cook well with direct grilling. You don’t need complex methods.
Substantial Cuts: One and a Half-Inch Thick Steaks
For thicker steaks, cooking time goes up to 10-14 minutes for medium-rare. These steaks do better with a mix of cooking methods.
Start with a high-heat sear for 2-3 minutes per side. Then, move to a cooler part of the grill. This method prevents overcooking.
This method helps cook the steak evenly. It’s worth the wait for these premium cuts.
Premium Thickness: Steaks Thicker Than Two Inches
Thicker steaks take 16-20 minutes or more. They need special techniques to avoid overcooking.
The reverse-sear method works well for these steaks:
- Start the steak over indirect heat (around 225-275°F) for 15-20 minutes
- Monitor internal temperature until it reaches 10-15°F below your target
- Move to direct high heat for a 2-3 minute sear on each side
- Remove and rest for optimal results
Heat penetration doesn’t increase linearly with thickness. A two-inch steak needs much more time than a one-inch cut. Patience becomes your most valuable ingredient for these cuts.
Always measure your steak thickness before grilling. This simple step helps you adjust your expectations and achieve perfect results.
Grilling Times for Different Steak Cuts
Learning how different steak cuts behave on the grill can make you a better grillmaster. Each cut has its own unique traits that affect cooking time and method. Muscle composition, fat distribution, and thickness all play key roles.
While thickness is important, it’s not the only factor. A one-inch ribeye cooks differently than a one-inch sirloin. This is because of how cattle develop muscle tissue across their bodies.
Ribeye Perfection
Learning how to grill ribeye steak starts with understanding its generous marbling. This fat makes ribeye forgiving on the grill. It keeps the meat moist, even if it’s slightly overcooked.
For a one-inch thick ribeye, cook for 6-8 minutes total to reach medium-rare. Cook for 3-4 minutes on the first side, then flip and cook for another 3-4 minutes. The internal temperature should be 130-135°F before resting.
The high fat content means ribeye can handle higher heat than leaner cuts. Use direct heat throughout cooking. The marbling creates beautiful grill marks and adds flavor to every bite.
New York Strip Excellence
New York strip steaks have less fat than ribeye but are full of flavor. They need 6-7 minutes of grilling times for a one-inch steak to reach medium-rare. You need to be precise with your timing because of the lower fat content.
Grill the strip steak over direct high heat for the whole time. Flip only once, at the halfway point. The strip benefits from a good sear that creates a flavorful crust while keeping the interior tender.
Watch carefully during the final minutes of cooking. Strip steaks can go from perfect to overdone quickly. Use a meat thermometer to confirm you’ve reached 130-135°F internally before removing from heat.
Filet Mignon Tenderness
Filet mignon is the most tender cut but has little fat. This lean profile means you need to adjust your grilling approach. A typical 1.5-inch thick filet requires approximately 5-6 minutes total cooking duration to reach medium-rare.
Because of the lack of internal fat, many grill experts recommend bacon wrapping or butter basting. These techniques add moisture and richness that the cut naturally lacks. You can also brush the filet with oil before grilling to prevent sticking.
Cook filet mignon over high direct heat, turning once at the midpoint. The goal is developing a nice crust while preserving the buttery interior texture. Remove from the grill at 125-130°F for perfect medium-rare results after resting.
T-Bone and Porterhouse Challenge
T-bone and porterhouse steaks present a unique grilling challenge. They combine two different cuts: strip steak and tenderloin. These sections cook at different rates, requiring strategic positioning on your grill.
For a 1.5-inch thick T-bone or porterhouse, plan for 10-14 minutes of total grilling times. Position the steak so the tenderloin side faces away from the hottest part of your grill. This prevents the more delicate tenderloin from overcooking while the strip side finishes.
Flip the steak only once, about halfway through cooking. You’re aiming for an internal temperature of 130-135°F in the strip portion. The tenderloin section will typically read slightly lower, which is ideal.
Sirloin Value and Flavor
Sirloin steak delivers excellent flavor at an economical price point. This cut comes from a well-exercised muscle group, giving it a firmer texture than premium cuts. You’ll need 6-8 minutes for medium-rare on a one-inch sirloin steak.
The key to great sirloin is proper preparation before grilling. Consider marinating for 2-4 hours to enhance tenderness. The marinade penetrates the firmer muscle fibers, creating a more enjoyable eating experience.
Grill sirloin over direct high heat, flipping once during cooking. Don’t press down on the steak with your spatula, as this squeezes out valuable juices. Let the heat work naturally to develop a flavorful crust while maintaining moisture inside.
| Steak Cut | Fat Content | 1-Inch Grilling Time (Medium-Rare) | Ideal Internal Temp | Special Considerations |
|---|---|---|---|---|
| Ribeye | High marbling | 6-8 minutes | 130-135°F | Most forgiving, tolerates high heat well |
| New York Strip | Moderate | 6-7 minutes | 130-135°F | Less margin for error, precise timing needed |
| Filet Mignon | Very lean | 5-6 minutes (1.5-inch) | 125-130°F | Benefits from bacon wrap or butter basting |
| T-Bone/Porterhouse | Variable | 10-14 minutes (1.5-inch) | 130-135°F | Position tenderloin away from hottest zone |
| Sirloin | Low to moderate | 6-8 minutes | 130-135°F | Marinating recommended for tenderness |
Remember, these grilling times are guidelines, not hard rules. Your grill’s heat, outdoor temperature, and starting meat temperature all affect cooking time. Always check the internal temperature to ensure doneness.
Each steak cut offers something special. Ribeye has rich flavor and is easy to cook. Strip steaks are balanced and lean. Filet mignon is tender for special occasions. T-bone and porterhouse give you two cuts in one. Sirloin is great value without sacrificing taste.
Charcoal Grill vs Gas Grill Cooking Times
Knowing how charcoal and gas grills work helps you cook steaks perfectly. Each grill type has its own strengths and challenges. These affect how you manage heat and timing.
Charcoal grills use coals for intense heat, while gas grills have consistent flame heating. These differences mean cooking times vary. You need to plan your grilling session carefully.
Charcoal Grill Steak Cooking Time
Charcoal grills can get very hot, up to 700°F. This heat comes from the coals and infrared radiation. This means steaks cook 1-2 minutes faster than on gas grills.
But, cooking times on charcoal grills can be unpredictable. The heat changes as coals burn down. Wind can also affect the coals. You need to keep an eye on the temperature to avoid overcooking.

The heat from glowing coals cooks the meat in a special way. It creates a great crust but requires careful watching. For a one-inch thick steak, cook it for about 3-4 minutes per side for medium-rare.
| Grill Type | Temperature Range | Heat Consistency | Cooking Time Variance |
|---|---|---|---|
| Charcoal Grill | 500-700°F | Variable (decreases over time) | 1-2 minutes faster |
| Gas Grill | 400-500°F | Highly consistent | Standard baseline timing |
| Infrared Gas Grill | 600-900°F | Very consistent | Similar to charcoal speed |
Gas Grill Steak Temperature Control
Gas grills offer superior temperature consistency and precise control. You can keep the temperature exactly where you want it. This makes timing more reliable.
Most gas grills work well in the 400-500°F range for steak grilling. The BTU output of your grill affects how fast it heats up and stays hot. Higher BTU ratings don’t always mean better results.
Gas grills heat evenly, reducing hot spots. This lets you cook multiple steaks at once with consistent results. But, they might take a bit longer to cook than charcoal grills.
With gas grills, you can adjust the heat instantly. If your steak is cooking too fast, just turn down the flame. This real-time control helps you get the perfect doneness without guessing.
Adjusting Times for Your Grill Type
Every grill is different, so cooking times are just a starting point. Your grill’s unique features and other factors affect how long it takes to cook. It’s not just about charcoal or gas.
Several things can change how your grill performs and need timing adjustments:
- BTU output for gas grills determines heating power and recovery speed
- Coal quality and quantity affect peak temperatures and burn duration for charcoal grills
- Lid design and ventilation influence heat retention and airflow
- Outdoor temperature and wind conditions impact heat consistency
- Grill age and maintenance affect overall performance efficiency
Instead of just following time guidelines, use internal temperature and visual cues. A meat thermometer gives you accurate readings, considering all factors. This method ensures consistent results, no matter the grill.
Do test runs to find your grill’s timing baseline. Cook a steak while watching both time and temperature. Note your findings and adjust future cooking sessions. This customized approach helps you cook perfectly, no matter your grill or environment.
Remember, your grill performs differently in different seasons. Cold winter air and hot summer heat change how it works. Wind, humidity, and altitude also play a role. Always check doneness by temperature, not just by time.
How to Check Steak Doneness Accurately
Learning to check steak doneness accurately is key to great grilling. Timing charts help, but grill temperature, steak thickness, and starting conditions vary. Using different methods to check doneness helps you get the perfect steak every time.
For the most reliable results, use a mix of scientific tools and practical checks. You need tools that give accurate feedback without messing up your steak’s cooking or losing juices.
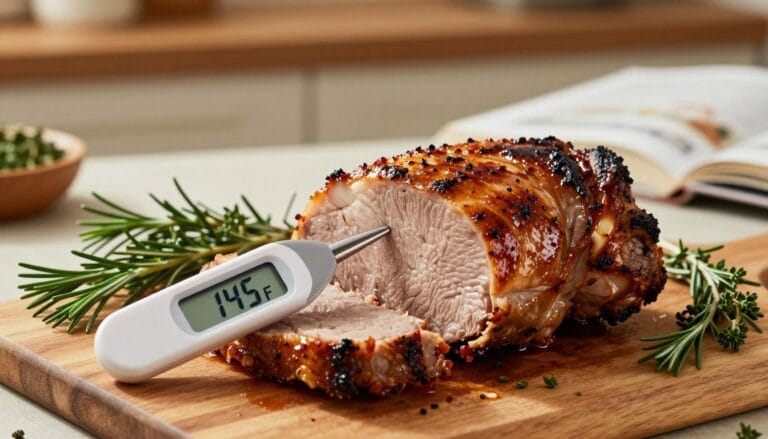
Using a Meat Thermometer for Perfect Results
A meat thermometer is the best way to check steak doneness at home. Instant-read digital thermometers give quick temperature readings. This method takes the guesswork out of grilling.
Put the thermometer probe into the thickest part of the steak, avoiding bone and fat. These areas heat up differently and can give wrong readings. Make sure the probe is angled horizontally into the meat for accurate temperature.
The temperature targets don’t change, no matter the steak’s thickness or cut. Take the steak off the grill when it’s about 5 degrees below your target. It will cook a bit more after you take it off.
| Doneness Level | Target Temperature | Internal Color | Texture Description |
|---|---|---|---|
| Rare | 125°F | Cool red center | Very soft and yielding |
| Medium-Rare | 135°F | Warm red center | Soft with slight resistance |
| Medium | 145°F | Warm pink center | Firm with some give |
| Medium-Well | 150-155°F | Slightly pink center | Firm with minimal give |
| Well-Done | 160°F+ | No pink throughout | Very firm throughout |
Digital instant-read thermometers cost between $15-$40 and last for years with care. They’re worth it for perfectly cooked steaks. Leave-in probe thermometers are great for thick steaks, letting you monitor the cooking process.
The Touch Test Method for Doneness
The touch test lets you check steak doneness without a thermometer. It’s based on how firm the steak feels. Getting good at this takes practice, but it’s a useful skill.
Relax your hand and touch your index finger to your thumb. Then, press the fleshy area below your thumb with your other hand. This soft feel is like rare steak. For medium-rare, touch your middle finger to your thumb, and so on.
Press the steak’s center gently with your finger or tongs. It should feel like the corresponding palm area for your desired doneness. This method works best after you’ve grilled many steaks and developed muscle memory.
Start with the touch test and timing estimates when you’re new to grilling. As you get more experience, you’ll notice the subtle differences in firmness that show each doneness level. Many chefs rely on this method after years of practice.
Visual Cues and Color Indicators
Watching your steak can give you clues about its doneness without tools or touching it. Juice color is a reliable indicator of internal doneness. Red or pink juices mean rare to medium, while clear or nearly clear juices indicate medium-well to well-done.
Changes in the steak’s surface also show cooking progress. You’ll see proteins pushing to the surface, creating small beads of moisture. The meat’s color changes from bright red to brown as it cooks, developing the flavorful crust you want.
Avoid cutting into your steak unless you must. Each cut releases juices and can disrupt even cooking. If you must cut, make a small incision in the thickest part, not a full slice.
Using visual markers, touch, and temperature testing together gives a complete picture. No single method tells the whole story, but together they ensure you pull your steak at the perfect time. Understanding the need for multiple checks to account for variables will improve your grilling consistency a lot.
Resting and Serving Your Grilled Steak
Many home grillers overlook the critical minutes after cooking. This resting phase transforms your steak’s texture and juiciness. The time your steak spends off the heat directly impacts the final eating experience.
Perfect grilled steak timing includes both the cooking duration and the resting period that follows. These final moments allow the steak to complete its transformation from good to exceptional. Your patience during this phase will be rewarded with superior flavor and texture.
The Science Behind Resting
When your steak cooks on the grill, intense heat forces moisture toward the center of the meat. The high temperatures also cause muscle fibers to contract and tighten significantly. This creates tension within the steak that needs time to release.
Resting allows the juices to redistribute throughout the entire piece of meat evenly. The muscle fibers begin to relax, creating pathways for moisture to flow back through the steak. This process ensures every bite delivers maximum flavor and tenderness.
Cutting into your grilled steak immediately after removing it from the grill causes dramatic juice loss. Studies show that up to 40% of the steak’s moisture can hemorrhage onto your cutting board when you skip the resting period. Those lost juices take flavor, tenderness, and satisfaction with them.

The temperature gradient within a freshly grilled steak is quite extreme. The exterior may be significantly hotter than the interior, creating instability. Resting time allows these temperatures to equalize, resulting in more consistent doneness throughout the cut.
Timing Your Rest Period
The thickness of your steak determines the appropriate resting time needed for optimal results. Thinner cuts require less time, while thicker steaks benefit from extended rest periods. A general guideline helps you calculate the right duration.
For steaks under 1.5 inches thick, a resting time of 5 to 10 minutes works perfectly. These thinner cuts don’t retain as much heat, so they reach equilibrium more quickly. This timeframe allows adequate juice redistribution without the steak cooling too much.
Thicker cuts exceeding 1.5 inches need 10 to 15 minutes of resting time for best results. These substantial steaks contain more thermal mass and require additional time for temperature stabilization. The extra minutes ensure the center reaches optimal temperature while juices settle.
A useful rule of thumb suggests that resting time should equal roughly half the cooking time. If you grilled your steak for 12 minutes, plan for a 6-minute rest. This proportional approach adjusts automatically based on your specific cooking duration.
| Steak Thickness | Recommended Resting Time | Temperature Rise Expected | Juice Retention Rate |
|---|---|---|---|
| Under 1 inch | 5-7 minutes | 3-5°F | 85-90% |
| 1 to 1.5 inches | 7-10 minutes | 5-7°F | 90-95% |
| 1.5 to 2 inches | 10-12 minutes | 7-10°F | 95-97% |
| Over 2 inches | 12-15 minutes | 10-12°F | 97-99% |
Carryover Cooking Explained
Your steak’s internal temperature continues to rise even after you remove it from the grill. This phenomenon, called carryover cooking, results from residual heat in the outer portions penetrating toward the center. Understanding this principle prevents overcooking your steak.
Most steaks experience a temperature increase of 5 to 10°F during the resting period. The exact rise depends on the steak’s thickness and the grill temperature used. Thicker cuts typically show more dramatic temperature changes than thinner ones.
To account for carryover cooking, remove your steak from the grill when it reaches 5°F below your target temperature. For medium-rare at 135°F, pull the steak at 130°F. The resting period will bring it to perfect doneness naturally.
This technique ensures you hit your desired level of doneness precisely every time. It compensates for the continuing heat transfer that occurs off the grill. Your steak reaches the ideal final temperature without overshooting into the next doneness level.
Proper resting technique involves more than just setting your steak aside for a few minutes. Place the steak on a wire rack set over a plate or cutting board to allow air circulation. This prevents the bottom from steaming and maintains the exterior crust you worked hard to create.
Tenting your steak loosely with aluminum foil helps retain warmth without trapping too much moisture. Avoid wrapping it tightly, as this creates a steaming environment that softens the crust. The goal is gentle heat retention, not active cooking.
Choose a warm plate or resting location away from cold surfaces that could rapidly cool your steak. Room temperature environments work best for maintaining the ideal serving temperature. Your steak should feel warm to the touch when resting time completes.
Perfect grilled steak timing encompasses the entire process from grill to plate, with resting as the critical final step. This often-overlooked phase ensures all your careful temperature control and cooking time calculations deliver the best possible results. The difference between a good steak and an exceptional one often comes down to these final minutes of patience.
Conclusion
Learning about grilling steak time and temperature is key to great results. You now know about heat zones, how to prepare, and checking doneness. This turns grilling into a skill you can rely on.
Your grill is unique. Keep notes on each grilling session. Record what works and what doesn’t. This guide will help as you grill different cuts and thicknesses.
Two things will make your steaks better: a good instant-read thermometer and patience. These tools and techniques avoid common mistakes.
Begin with the timing tips from this article. Use them as a starting point. Pay attention to your grill’s response. Notice how different cuts cook.
Every grill master started where you are. The difference is in practice and paying attention. Each time you grill, you’ll get better at managing heat and timing.
Your confidence will grow with each successful steak. Soon, you’ll adjust cooking times based on thickness, cut, and doneness. You’ll impress everyone with perfectly grilled steaks.