Pork Cutlet Recipe Basics: Ingredients, Techniques, and Tips
There’s something magical about biting into a perfectly cooked pork cutlet. The sound of that crispy exterior cracking under your teeth, followed by the tender, juicy meat inside—it’s a moment that takes you back to your grandmother’s kitchen or a favorite restaurant meal. You’ve probably tasted a pork cutlet recipe at some point and wondered how to recreate that restaurant-quality magic at home.
Making a best pork cutlet recipe isn’t as difficult as you might think. Whether you’re cooking for your family on a busy weeknight or impressing guests at a dinner party, this guide will teach you everything you need to know. You’ll learn about selecting the right cuts of meat, mastering essential preparation techniques, and cooking your cutlets to golden perfection.
Pork cutlets have earned their place as a beloved staple in kitchens across America. You’ll find them in European schnitzels, Asian katsu variations, and countless other dishes. The beauty of a pork cutlet recipe lies in its versatility. You can adapt it to match almost any cuisine or dietary preference you prefer.
This article breaks down the complete process into manageable steps. You’ll discover ingredient selection, preparation methods, cooking techniques, and troubleshooting tips. By the end, you’ll have the knowledge needed to create restaurant-quality pork cutlets in your own kitchen, whether you’re a beginner or an experienced cook.
Table of Contents
Understanding Pork Cutlets: What are They?
A pork cutlet is a thin slice of pork that’s been pounded to be even. This makes tough cuts tender and quick to cook, great for weeknights. You can find pork cutlets in many cuisines, like European schnitzel and Japanese tonkatsu. Knowing what makes a cutlet special helps you pick the right meat and cook it right.
The Different Cuts of Pork
There are many good meats for cutlets. Each cut adds something special to your dish:
- Pork loin chops – Lean and tender, perfect for quick cooking
- Pork tenderloin – Premium cut with minimal fat, great for fancy dishes
- Pork leg – More affordable with a bit more texture
- Pork shoulder – Rich flavor, but needs careful pounding
Pork schnitzel likes loin cuts for their tenderness. Japanese tonkatsu also uses loin for its light, crispy texture.
How Cut Thickness Affects Cooking
Thickness is key to your cooking success. Cutlets should be between one-quarter inch to one-half inch thick. This ensures a crispy outside, juicy inside, and quick cooking time.
| Thickness | Cooking Time | Best For | Result |
|---|---|---|---|
| ¼ inch | 2-3 minutes per side | Pan-frying | Very crispy, quick cooking |
| ⅜ inch | 3-4 minutes per side | All methods | Balanced crust and tenderness |
| ½ inch | 4-5 minutes per side | Breading and frying | Crispy outside, juicy inside |
| ¾ inch or thicker | 6+ minutes per side | Grilling | Risk of drying out |
Uneven thickness in a cutlet is a big problem. Thinner parts cook too fast and dry out, while thicker parts stay raw. Even cooking is key, so pounding your meat to the same thickness is crucial. This is especially true for Japanese pork cutlet, where even texture is essential.
“The key to perfect cutlets isn’t fancy technique—it’s understanding your meat and respecting the basic principles of even cooking.”
Essential Ingredients for Your Pork Cutlet Recipe
Creating a tasty easy pork cutlet recipe starts with the right ingredients. You don’t need a long list to impress. Fresh pork, basic seasonings, and a few extra ingredients make your dish stand out.
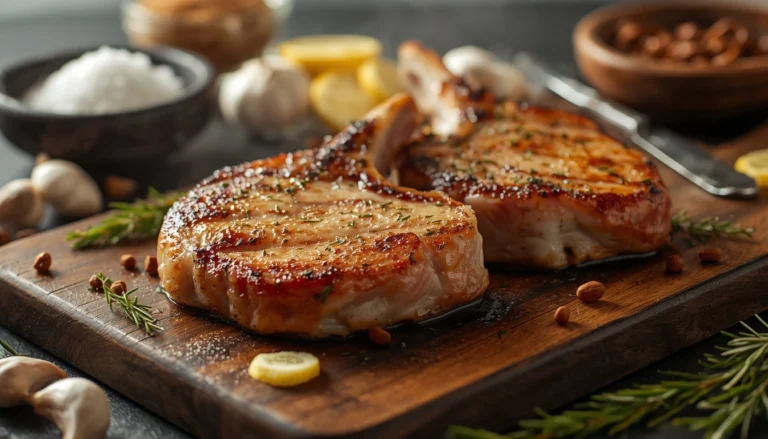
Choosing the Right Pork Cut
The cut of pork you choose is key. Opt for boneless pork chops from the center loin or rib section. These cuts are tender and have a pale pink color, showing they’re fresh.
When shopping, ask for cutlets that are about one-quarter to one-half inch thick. Thinner cuts cook faster and more evenly. If needed, ask the butcher to pound the meat for even thickness.
- Center loin chops offer lean, tender meat
- Rib chops contain slightly more fat for added flavor
- Boneless cuts work best for a uniform appearance
- Look for pale pink color and firm texture
Must-Have Seasonings and Marinades
Basic pantry staples are all you need for a flavorful easy pork cutlet recipe. Salt and black pepper are the base. Add garlic powder for depth and paprika for warmth and color.
A simple marinade can make your dish even better. Mix olive oil, lemon juice, minced garlic, and salt. Let your cutlets soak for thirty minutes to two hours before cooking.
| Seasoning | Amount per Pound | Purpose |
|---|---|---|
| Salt | 1 teaspoon | Enhances natural flavors |
| Black pepper | 1/2 teaspoon | Adds gentle heat and complexity |
| Garlic powder | 1/2 teaspoon | Provides savory depth |
| Paprika | 1/4 teaspoon | Contributes warmth and color |
Optional Add-Ins for Extra Flavor
Once you know the basics, try adding extra ingredients. Fresh herbs like thyme and rosemary add a nice earthy flavor.
Here are some optional ingredients to consider:
- Lemon or orange zest for bright acidity
- Dijon mustard mixed into marinades for tanginess
- Worcestershire sauce for umami depth
- Fresh rosemary or thyme sprigs
- Balsamic vinegar for subtle sweetness
Quality ingredients don’t mean expensive or complicated choices. Your easy pork cutlet recipe benefits from fresh, simple components. Knowing how each ingredient helps makes your pork cutlets delicious every time.
Preparing Your Pork Cutlets for Cooking
Getting your pork cutlets ready is key to a great dish. The steps before cooking ensure a crispy outside and tender inside. Just a few minutes of extra prep can make your breaded pork taste like it’s from a restaurant.
Proper Thawing and Drying Techniques
Thawing frozen pork cutlets safely and correctly is crucial. The best way is to thaw them in the fridge for 24 hours. If you’re in a hurry, thaw them in cold water for 30 to 60 minutes in a sealed bag.
After thawing, drying your cutlets is essential. Use paper towels to dry them completely. Moisture stops the breading from sticking well. Wet cutlets also lead to oil splatters and soggy crusts.
Tenderizing the Meat: Tips and Tricks
Pounding your cutlets to the same thickness is vital for even cooking. Place them between plastic wrap or parchment paper. Use a meat mallet for gentle, outward strokes from the center. This method prevents tears and ensures evenness.
- Pound slowly and steadily
- Work from the center outward
- Aim for quarter-inch thickness
- Keep the meat between protective layers
Some use tenderizers with papain or bromelain. Your choice depends on the cut of pork. Better cuts need less tenderizing. This step greatly affects your dish’s texture and flavor.
Cooking Techniques for Perfect Pork Cutlets
You have three great ways to cook pork cutlets. Each method has its own benefits. Your choice depends on your kitchen and the flavors you like. Each way can make your cutlets delicious if you follow the right steps.
Pan-Frying: The Classic Method
Pan-frying is the most popular way to make fried pork cutlets at home. It gives you that golden-brown crust everyone loves. Use a heavy-bottomed skillet or cast iron pan for even heat.
Heat your oil to 350-375°F for the best results. Make sure the oil is about one-quarter inch deep in your pan. When it’s hot, put your breaded cutlet in the pan and cook for 3-4 minutes on the first side.
- Check for a golden-brown color before flipping
- Cook the second side for another 3-4 minutes
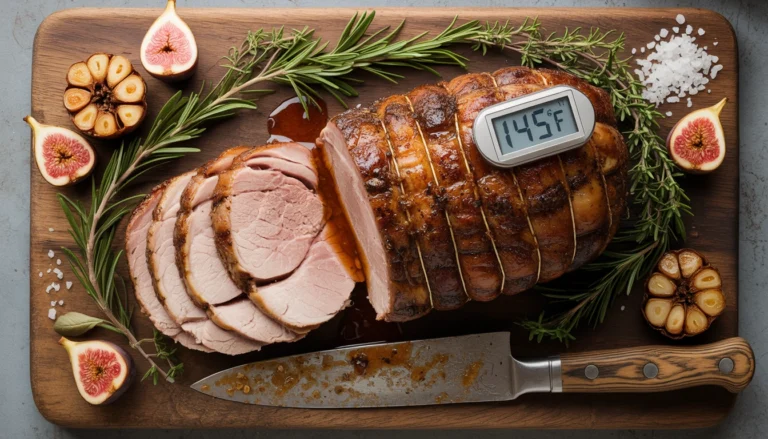
- Use a meat thermometer to verify internal temperature reaches 145°F
- Transfer finished cutlets to paper towels to drain excess oil
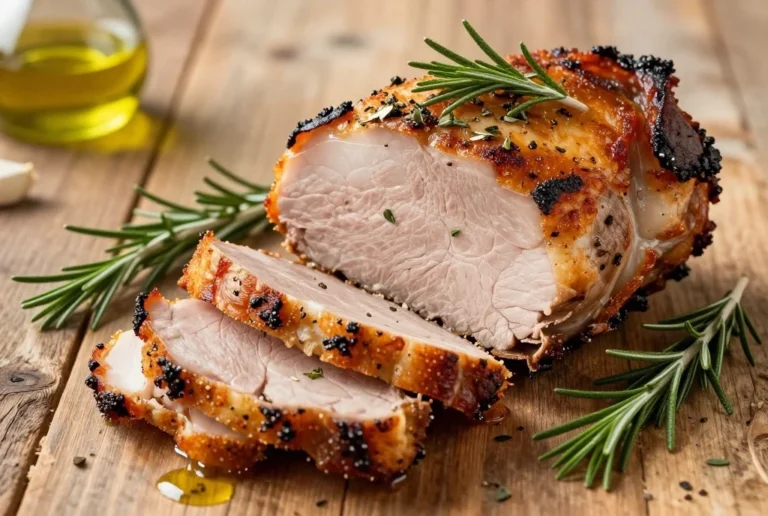
The fried pork cutlet will have a crispy outside and a juicy inside. Just don’t poke holes in it while it’s cooking.

Oven-Baking for Healthier Options
Oven-baking is a great way to use less oil. Preheat your oven to 400-425°F. Put a wire rack over a baking sheet for air to circulate.
Put your breaded cutlet on the rack and spray it lightly with oil. Bake for 12-15 minutes until it’s 145°F inside. This method makes a crispy crust with less oil.
- Position rack in upper third of oven
- Preheat for at least 10 minutes
- Spray cutlets lightly with oil spray
- Bake until golden and cooked through
- Let rest 3-5 minutes before serving
Grilling Cutlets for a Smoky Flavor
Grilling gives your pork cutlet a smoky taste. Heat your grill to medium-high, about 350-375°F. Make sure to oil your grill grates to prevent sticking.
Put your breaded cutlet on the grill and cook for 3-4 minutes per side. Watch out for flare-ups from oil. If flames get too big, move the cutlets to a cooler spot. The cutlet will get a nice char and stay juicy inside.
| Cooking Method | Temperature Range | Cooking Time Per Side | Best For |
|---|---|---|---|
| Pan-Frying | 350-375°F | 3-4 minutes | Maximum crispiness and flavor |
| Oven-Baking | 400-425°F | 12-15 minutes total | Healthier, less oil preparation |
| Grilling | 350-375°F | 3-4 minutes | Smoky flavor and grill marks |
Your pork cutlet is done when it’s 145°F inside. Use a meat thermometer to check without cutting into it. Choose the method that works best for you and your taste.
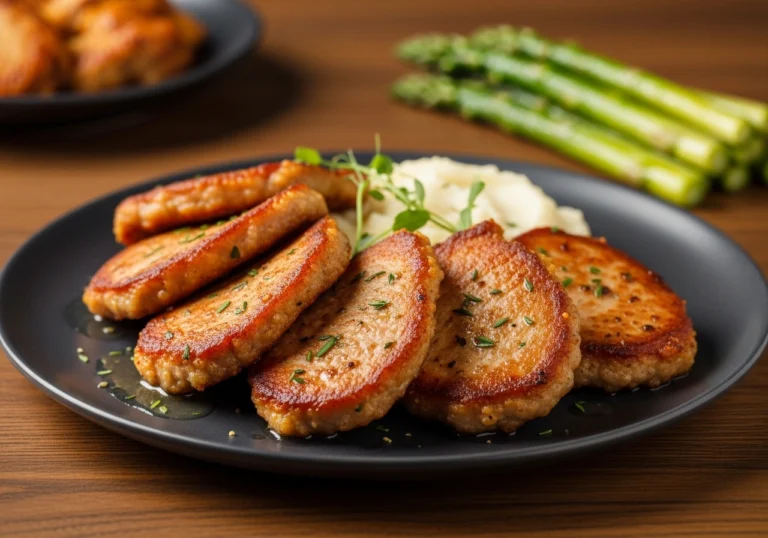
Breading Your Pork Cutlets: Step-by-Step
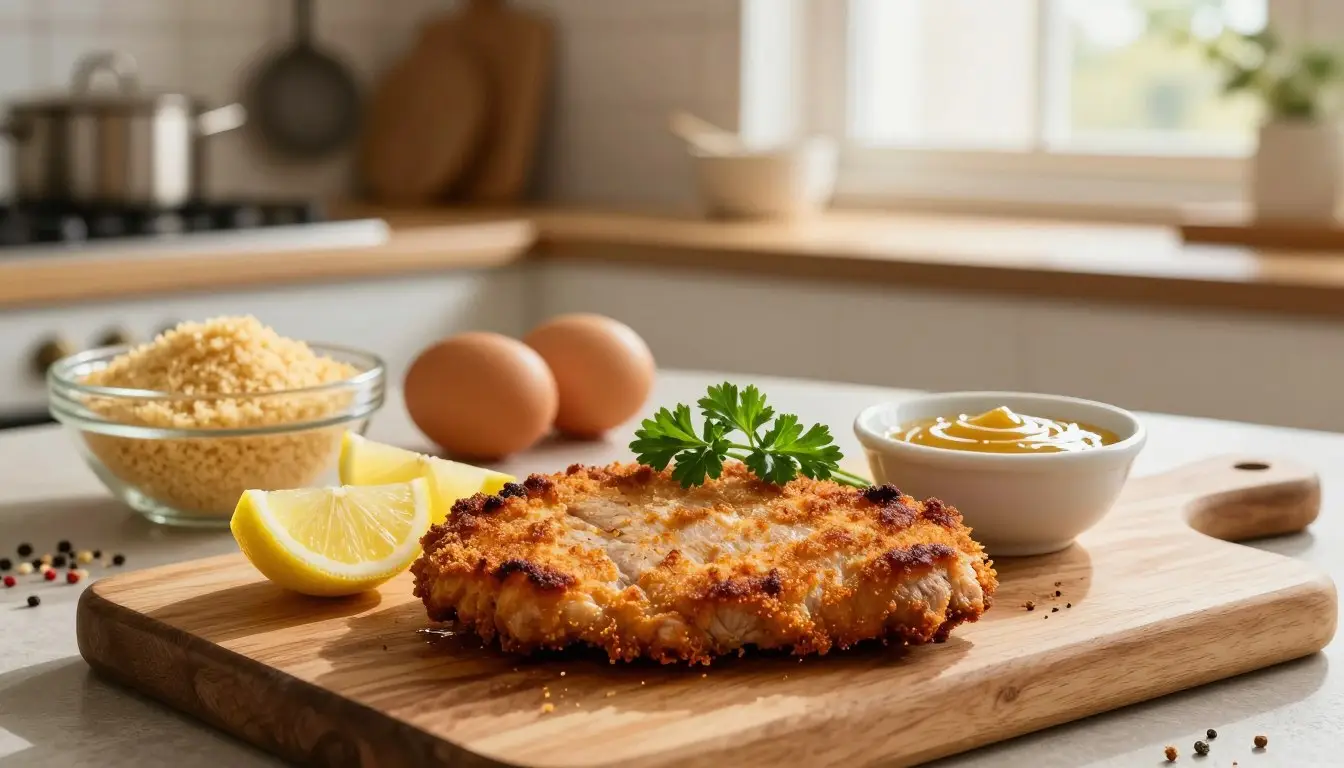
Creating a crispy pork cutlet starts with mastering the breading technique. The coating turns your meat into a golden, crunchy masterpiece. It tastes like it came from a restaurant. Knowing the right steps ensures great results every time.
The breading process needs patience and detail. Your cutlets must be fully covered for the perfect texture. Here are the key steps to make your pork cutlets impressive.
Traditional Breading Method Explained
The classic three-station approach makes a reliable, crispy coating. Set up your workspace with three shallow bowls before starting.
- Station 1 (Flour): Mix flour with salt, pepper, and garlic powder in a shallow dish
- Station 2 (Egg Wash): Whisk eggs with a splash of milk or water until smooth
- Station 3 (Breadcrumbs): Use panko or traditional breadcrumbs mixed with salt, pepper, and optional Parmesan cheese
Coat each cutlet in flour, then shake off excess. Dip it into the egg wash, ensuring full coverage. Press the cutlet into breadcrumbs, using your fingers to push the coating into the meat.
Let your breaded cutlets rest for 10 to 15 minutes before cooking. This resting period helps the coating stick better and fry more evenly.
Alternative Crusts for Different Flavors
You can create unique variations of the crispy pork cutlet by experimenting with different coatings. Crushed cornflakes add extra crunch and a subtle sweetness. Seasoned panko mixed with Italian herbs delivers Mediterranean flavors.
For low-carb alternatives, almond flour creates a nutty crust with less flour content. Crushed crackers, whether saltines or herbs-flavored varieties, provide distinctive taste profiles that change your dish completely.
| Coating Option | Flavor Profile | Best For |
|---|---|---|
| Panko with Parmesan | Savory and Rich | Classic Italian Style |
| Crushed Cornflakes | Crunchy and Slightly Sweet | Extra Texture |
| Almond Flour Mix | Nutty and Mild | Low-Carb Diets |
| Herb Seasoned Panko | Aromatic and Fresh | Mediterranean Meals |
Your choice of coating greatly affects the taste and texture of your crispy pork cutlet. Mix and match these options to suit your preferences and dietary needs.
Tips for Achieving the Perfect Golden Crust
Getting a golden-brown crust is key to a great homemade pork cutlet. It turns a simple dish into a restaurant-quality meal. The right heat and oil are crucial for this.
Temperature Control During Cooking
Heat is the base of a perfect crust. Your oil must be between 350 and 375 degrees Fahrenheit before frying. If it’s too cool, your cutlet soaks up too much grease. Too hot, and it burns outside while staying raw inside.
Use a kitchen thermometer for accurate oil temperature. Or, try the breadcrumb test. If it sizzles right away but doesn’t burn, it’s ready. Keep the heat steady by adjusting the burner.
Don’t overcrowd your pan. Each cutlet lowers the oil temperature. Cook in batches for even heat and browning.
The Role of Oil in Frying
Choosing the right oil is as important as temperature. Use neutral oils like vegetable, canola, or peanut oil. They handle high heat without breaking down or adding bad flavors.
Oil depth is also key. Use about one-quarter to one-half inch for shallow frying. This depth helps your cutlet stay crispy without soaking up too much oil.
- Vegetable oil works well for most recipes
- Canola oil offers a neutral taste and high smoke point
- Peanut oil adds subtle flavor and excellent heat resistance
“The right oil temperature makes the difference between a crispy crust and a greasy disappointment.”
Change your frying oil every three to four uses. Strain it between uses to keep it clean. Dispose of used oil by letting it cool, then putting it in a sealed container for trash. Never pour hot oil down your drain.
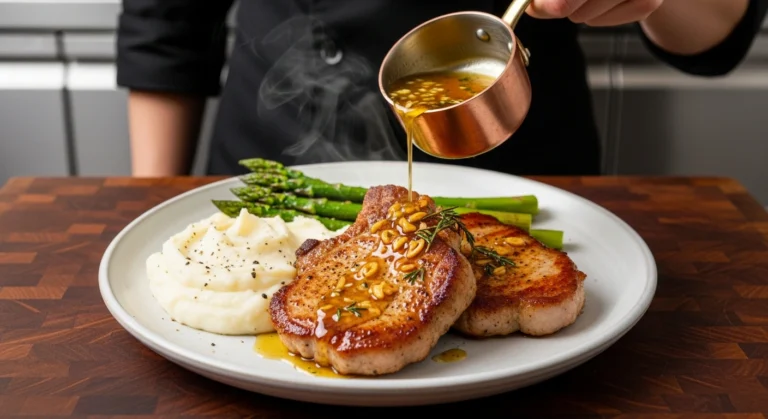
Serving Suggestions for Pork Cutlets
Your perfectly cooked pork cutlets deserve more than just a plate. The right sides and sauces can make your meal feel like a restaurant dish. When you finish cooking, you still have choices that shape the entire dining experience. Think about balance—your crispy, rich cutlet pairs beautifully with fresh, acidic, or creamy accompaniments that provide contrast.
The beauty of cutlet dishes appears when you respect tradition while making them your own. Whether you’re serving pork katsu in the Japanese style or German schnitzel, the supporting elements matter just as much as the main dish itself.
Pairing Sides that Complement Pork
Your side dishes should balance the richness of your cooked cutlets. Consider these proven pairings:
- Steamed white or brown rice with shredded cabbage (traditional for pork katsu)
- Roasted vegetables like carrots, broccoli, and Brussels sprouts
- Creamy mashed potatoes or buttered egg noodles
- Fresh green salad with vinaigrette dressing
- German-style potato salad with warm vinegar dressing
- Pickled vegetables for brightness and crunch
When you plate your meal, arrange sides to show off your crispy cutlet. Leave space around your pork katsu or other cutlet varieties. This presentation makes your home-cooked dish look polished and intentional.
Adding Sauces for Extra Flavor
The right sauce enhances your cutlets without overwhelming their natural flavor. Your sauce options include:
| Sauce Style | Best For | Flavor Profile |
|---|---|---|
| Tonkatsu Sauce | Pork katsu and Japanese preparations | Sweet, tangy, slightly umami-rich |
| Lemon and Capers | European-style schnitzel | Bright, acidic, briny notes |
| Mushroom Gravy | Comfort-food American versions | Rich, savory, earthy |
| Honey Mustard | All cutlet varieties | Sweet-tangy with slight heat |
You can make simple pan sauces using the browned bits left in your cooking pan. Add broth, cream, or wine to create something special in minutes. Drizzle your sauce lightly over your cutlets or serve it on the side so diners control the amount.
Storing and Reheating Leftover Pork Cutlets
Your pork cutlet recipe doesn’t have to end when dinner is over. Leftover cutlets can stay delicious for several days with the right storage and reheating. Proper storage keeps your meal safe and maintains quality. Learning these techniques lets you enjoy your pork cutlet recipe more than once, without losing taste or texture.

Best Practices for Refrigeration
Let your cooked cutlets cool to room temperature before refrigerating. Never leave them out for more than two hours. Once cooled, put your pork cutlets in airtight containers to prevent drying out.
Use paper towels inside the container to absorb extra moisture. This prevents your cutlets from getting soggy. When stacking, use parchment paper to keep them from sticking. Your refrigerated cutlets stay safe to eat for three to four days.
Freezing is great for longer storage. Wrap each cutlet in plastic wrap, then foil. Label the package with the date. Properly wrapped pork cutlets last up to three months in the freezer.
Reheating Tips to Maintain Texture
The microwave is bad for reheating breaded cutlets. It makes the crust soggy and chewy. Use your oven for the best results.
Preheat your oven to 350°F. Place cutlets on a wire rack over a baking sheet. This setup keeps the bottom from getting damp. Reheat for ten to fifteen minutes until hot through.
For faster reheating, try an air fryer. Set it to 350°F and reheat for five to seven minutes. Air fryers quickly restore crispiness. Before reheating, lightly brush the cutlet with oil to refresh the golden crust.
- Cool cutlets completely before refrigerating
- Store in airtight containers with paper towels
- Separate cutlets with parchment paper
- Use oven or air fryer for reheating
- Brush with oil before warming
- Avoid the microwave entirely
Troubleshooting Common Pork Cutlet Issues
Even the most skilled cooks can run into problems with pork cutlets. Knowing how to spot and solve common issues can make you more confident in the kitchen. Luckily, most problems have easy fixes.
Overcooking: Signs and Solutions
Dry, tough meat is a clear sign of overcooking. When pork cooks too long, it loses moisture and becomes hard to chew. You might notice it lacks juiciness or feels rubbery.
Use a meat thermometer to check your fried pork cutlet’s temperature. The USDA says pork is safe at 145°F. But, pull your cutlets from heat when they reach 140°F. They will continue cooking a bit while they rest, reaching the safe temperature without drying out.
Thinner cutlets cook faster than thicker ones. So, watch thin cutlets closely since they need less time on each side. If you end up with overcooked cutlets, slice them and serve them with sauce. The moisture from the sauce will make the meat taste better.
Soggy Crust: Causes and Fixes
A soggy, limp crust can ruin a perfect fried pork cutlet. This can happen for a few reasons. Your oil might not be hot enough before adding the meat. A crowded pan cools the oil down. Wet meat before breading traps steam and softens the crust. Skipping the resting period after breading removes the protective coating.
Drain your cooked cutlets on a wire rack instead of paper towels. Paper towels trap steam and moisture against the crust. Make sure your oil reaches 350°F before adding cutlets. Space your cutlets apart so they cook evenly without crowding. Pat your meat dry with paper towels before breading it. Let breaded cutlets rest for five to ten minutes before frying.
Never cover your cutlets while they rest after cooking. A cover traps steam that softens the crust. Let them sit uncovered on a wire rack. These simple steps will give you a crispy exterior that stays crunchy even after a few minutes.